
Learning how to change a tire is one of the most valuable and practical skills any driver can have. Flat tires can happen unexpectedly while driving on highways, rural roads, or even within the city, and being prepared to handle the situation can save time, money, and stress. Many drivers rely entirely on roadside assistance services, but understanding the process of changing a tire yourself can be extremely helpful when assistance is unavailable or delayed. Knowing the correct steps ensures that the task is done safely and efficiently without causing damage to the vehicle or risking personal injury. Changing a tire may seem intimidating at first, especially for new drivers, but with the right knowledge and preparation it becomes a straightforward process that anyone can learn. The key is understanding the tools involved, following safety precautions, and performing each step in the correct order. This guide explains everything in detail so that drivers feel confident handling a flat tire whenever it occurs.
Understanding Why Tires Go Flat
Before learning how to change a tire, it is important to understand why tires become flat in the first place. Tires are designed to be durable and strong, but they are constantly exposed to rough road conditions, sharp objects, and changes in temperature and pressure. A flat tire often occurs when a nail, screw, or piece of sharp metal punctures the rubber surface, allowing air to slowly leak out. Sometimes the damage can occur suddenly if the object is large or sharp enough to create a significant hole. Other times, the air leak is gradual and drivers may not notice until the tire becomes visibly deflated. Another cause of flat tires is driving over potholes or curbs, which can damage the tire sidewall or bend the wheel rim. Tire wear is also a factor, because older tires with worn treads are more vulnerable to damage and punctures. Understanding these causes helps drivers become more aware of road hazards and encourages regular tire inspections to reduce the chances of unexpected problems.
Essential Tools Needed to Change a Tire
Changing a tire requires several basic tools that are usually included with most vehicles. These tools are designed specifically for emergency tire replacement and are typically stored in the trunk or underneath the cargo floor. The most important tool is the spare tire, which is used to temporarily replace the damaged one so the vehicle can continue driving. In addition to the spare tire, a jack is required to lift the car off the ground so the wheel can be removed safely. The lug wrench is another essential tool used to loosen and tighten the lug nuts that hold the tire in place. Some vehicles also include wheel wedges or chocks that prevent the car from rolling while it is lifted. A flashlight, gloves, and reflective warning triangles can also be extremely helpful during nighttime emergencies or when changing a tire on the roadside. Having all these tools available and knowing where they are located in the vehicle can make the entire process much smoother and less stressful.
Choosing a Safe Location
One of the most important steps when changing a tire is choosing a safe location. If a flat tire occurs while driving, the first priority should always be personal safety rather than immediately attempting to replace the tire. Drivers should slowly reduce their speed and carefully move the vehicle to the side of the road or another safe area away from traffic. A flat, stable surface is ideal because it allows the jack to support the vehicle securely without slipping. Parking on a slope or uneven ground can be dangerous because the vehicle may shift or roll while it is lifted. After stopping the car, the hazard lights should be turned on to alert other drivers of the situation. Placing reflective warning triangles behind the vehicle can further improve visibility and reduce the risk of accidents. Taking a few extra minutes to ensure the vehicle is in a safe position can make a significant difference in preventing injuries or complications during the tire replacement process.
Loosening the Lug Nuts
Once the vehicle is safely parked and the tools are ready, the next step is loosening the lug nuts that secure the tire to the wheel hub. Lug nuts are typically tightened very firmly to ensure the wheel remains secure during driving, which means they can be difficult to remove if the vehicle is already lifted. For this reason, they should always be loosened slightly before raising the car with the jack. Using the lug wrench, each nut should be turned counterclockwise to break the initial tightness. It is not necessary to remove the nuts completely at this stage; loosening them just enough to make them easier to remove later is sufficient. Applying steady pressure on the wrench helps prevent slipping and reduces the risk of damaging the lug nuts. In some cases, drivers may need to use their body weight to apply extra force, especially if the nuts were tightened with power tools during the last tire installation. Once all the nuts are loosened slightly, the vehicle can be safely lifted.
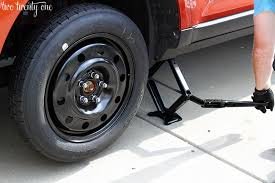
Lifting the Vehicle with the Jack
After loosening the lug nuts, the vehicle must be lifted using the jack so the flat tire can be removed. Most vehicles have designated jack points located along the underside of the frame near each wheel. These points are reinforced areas designed to support the weight of the car safely during maintenance tasks. Placing the jack in the correct position is extremely important because lifting the car from an incorrect location can damage the vehicle or cause the jack to slip. Once the jack is properly positioned, the handle can be turned to raise the car gradually. The goal is to lift the vehicle just high enough so that the flat tire is completely off the ground and can rotate freely. While the car is lifted, it is important to avoid placing any part of the body underneath the vehicle, as this can be dangerous if the jack shifts unexpectedly. Maintaining stability during this step ensures the tire removal process can proceed safely.
Removing the Flat Tire
With the vehicle lifted and the lug nuts loosened, the next step is removing the flat tire from the wheel hub. The lug nuts should now be unscrewed completely and placed in a safe location where they will not roll away or become lost. After removing the nuts, the tire can be pulled straight toward the driver to detach it from the wheel studs. Sometimes the tire may feel stuck due to rust or pressure, but gently wiggling it from side to side usually helps loosen it. Once the tire is removed, it should be laid flat on the ground to prevent it from rolling away. This step is also an opportunity to quickly inspect the wheel hub and surrounding components to ensure there are no visible damages or obstacles that might interfere with installing the spare tire. Removing the flat tire carefully prepares the vehicle for the next stage of the process.
Installing the Spare Tire
After the damaged tire has been removed, the spare tire can be installed onto the wheel hub. The spare tire should be lifted and aligned with the wheel studs so that the holes in the wheel match the studs on the hub. This may require a bit of adjustment to ensure the tire fits correctly. Once aligned, the tire can be pushed firmly onto the hub until it sits flat against the mounting surface. The lug nuts should then be placed back onto the studs and tightened by hand to hold the tire in position. At this stage, the nuts should only be tightened enough to secure the wheel temporarily, as they will be fully tightened once the vehicle is lowered back to the ground. Installing the spare tire correctly ensures the wheel remains balanced and stable during the final steps of the tire replacement process.
Lowering the Vehicle and Tightening the Lug Nuts
Once the spare tire is in place, the vehicle can be carefully lowered back to the ground using the jack. The jack handle should be turned slowly to lower the vehicle until the tire makes full contact with the ground. After the vehicle is completely lowered, the jack can be removed from underneath the car. The final step involves tightening the lug nuts securely using the lug wrench. It is recommended to tighten the nuts in a crisscross or star pattern rather than going around the wheel in a circle. This method ensures the tire is evenly secured against the hub and prevents uneven pressure that could cause vibrations while driving. Each nut should be tightened firmly but without excessive force that might damage the threads. Once the nuts are fully tightened, the tire replacement process is complete.
Driving Safely with a Spare Tire
After replacing the flat tire with a spare, drivers should remember that spare tires are usually designed for temporary use only. Many vehicles come with compact “donut” spare tires that are smaller and lighter than regular tires. These spares are intended to allow drivers to reach a repair shop safely rather than continue normal driving for long distances. When using a spare tire, it is important to drive at reduced speeds and avoid long trips if possible. Most manufacturers recommend not exceeding speeds of around 50 miles per hour while using a temporary spare. Drivers should also arrange to repair or replace the damaged tire as soon as possible so that the vehicle can return to its normal driving condition.
Frequently Asked Questions
What should I do if my tire becomes flat while driving?
You should slow down gradually, turn on your hazard lights, and move the vehicle to a safe location away from traffic before attempting to change the tire.
How long does it usually take to change a tire?
For someone familiar with the process, changing a tire usually takes around fifteen to thirty minutes depending on the situation.
Can I drive long distances on a spare tire?
Most spare tires are designed for temporary use and should only be used long enough to reach a repair shop.
Do all cars come with a spare tire?
Many vehicles include a spare tire, but some modern cars may only provide a tire repair kit instead.
Is it safe to change a tire on the side of a busy road?
It is safer to move the vehicle to a quieter or less crowded location whenever possible before changing the tire.
Conclusion
Knowing how to change a tire is an essential skill that every driver should learn. Flat tires can occur at any time, and being prepared to handle the situation independently provides both convenience and peace of mind. By understanding the tools required, choosing a safe location, and following each step carefully, drivers can replace a damaged tire efficiently and safely. Although the process may seem complicated at first, practice and familiarity make it much easier over time. Developing this practical skill not only increases confidence on the road but also ensures that unexpected tire problems do not turn into major inconveniences.